Category: baking (Page 4 of 7)

Lois’ Cream Puff Sticks

Oh, college.

I was a nerd. Let me count the ways:

Freshman year, I signed up for the quiet, substance-free dorm. Actually, my parents hijacked the process and requested the Centennial dorm for me. Fortunately, my first roommate ended up becoming one of my best friends all four years. She’s still one of the funniest people I know.

I didn’t have a drink until I officially turned 21 and stayed up past 1am. . . once. I only dated a few people and one of them cheated on me Mean Girls-style (seriously, it was just like out of the movie) at a Halloween party. She was dressed up like a Playboy bunny and I was probably sitting at home in my pajamas reading a book. I was like Taylor Swift. Not the award show, glamorous Taylor but the one she sang about wearing sneakers and sitting on the bleachers.

I may have been a nerd, but I was a happy nerd with the really fantastic friends.

For three years, I worked at the school as a Writing/Reading/Speaking Consultant. The woman who hired me was a saint for putting up with college Jeni (as was anyone else who hired me during or soon after college). Each year, she invited the staff over to her home for magnificent, home-cooked meals around Christmas and the end of the school year.

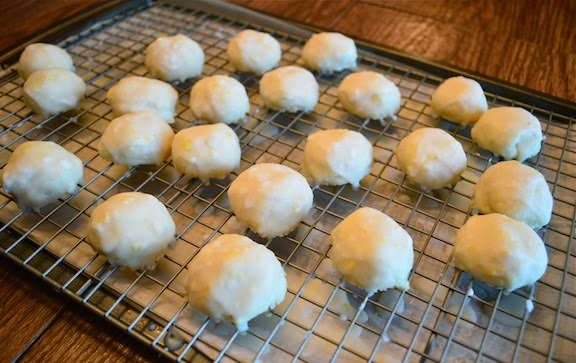
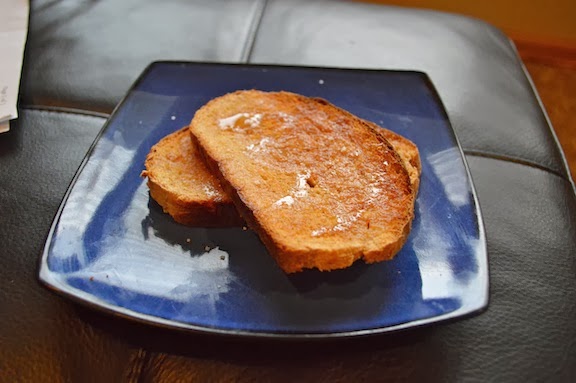
I especially remember a treat she made called cream puff sticks. I had never tasted anything like them and haven’t since. They are so delicate and airy that you’ll want to eat a whole cream puff plank. The dough also doesn’t contain sugar, making this treat ideal for those of us who don’t like sickly, sweet desserts. Lois was gracious enough to let me to share her recipe here, adding that when her grandchildren visit, they often request these cream puff strips for breakfast. This makes me so happy.

It’s the easiest, most elegant dessert you can prepare. Cream puff dough entails making pate a choux. Unlike cookie or cake dough, you cook it on the stove top and slowly add eggs. Don’t be intimidated by this dough because it’s actually simple to make.

Cream Puff Strips.jpg

Adapted from Lois Trachte’s recipe

Ingredients:
1 cup of water
1/2 cup of butter (1 stick)
1 cup flour
1/2 teaspoon salt
2 teaspoons vanilla extract
4 large eggs

Glaze:
Powdered Sugar
Milk or cream (I used almond milk)
Butter, a little dab
Vanilla extract
Salt, a pinch

Instructions

  1. Preheat oven to 450℉.
  2. Grease a large baking sheet, or line one with parchment paper.
  3. In a large saucepan, boil the water. Melt the stick of butter in the boiling water and turn off the heat.
  4. Stir in flour and 1/2 teaspoon of salt until the mixture forms a ball. Remove from heat and let it cool for a couple of minutes. 
  5. Crack all four eggs in a bowl.
  6. After mixture has cooled slightly, add vanilla extract. Vigorously stir in one egg into the dough at a time. Each time you add an egg, the dough will look strange and separate into pieces. Just keep stirring and it will reincorporate.
  7. Spread the dough into two strips on the baking sheet. The dough is sticky, so use the back of a spoon or offset spatula and do your best.
  8. Bake at 450℉ for 20 minutes. Reduce heat to 400℉ and bake for another 25 minutes. If the bottoms seem to be browning too quickly, reduce heat to 375℉ or remove from oven a little early. Cool completely before glazing.
  9. To make the glaze, mix about a cup of powdered sugar with a little milk. Keep adding milk until you like its texture. Add a splash of vanilla extract and a little pinch of salt to balance out the sweetness.
  10. Glaze the cream puff planks and cut into strips with a pizza cutter.

Church Cookbook Wacky Cake With Cocoa-Coffee Glaze

I stumbled upon Wacky Cake as a youth quite by accident.

My parents were very frugal, especially my mom. I’m sure she learned this from her parents who lived through the Great Depression. I remember visiting my grandma in Cuyahoga Falls, OH and finding bags filled with bags, boxes filled with wrapping paper she had carefully peeled from gifts, and baggies filled with twist ties.

My mom’s rule was that I could embark on cooking and baking projects as long as I bought the ingredients we didn’t have. Although this rule seems misguided in hindsight, I think her intention was to teach me to appreciate the food we had in our kitchen.

Therefore, I baked a lot since our pantry was typically stocked with typical baking supplies and if we were missing something, they were cheap enough to buy with my babysitting money or allowance.

I was an avid reader and loved reading cookbooks. One day, I baked Wacky Cake from a recipe I found in our church’s cookbook since we already had all of the ingredients. Later, I learned that Wacky Cake possibly originated during the Great Depression or as a result of wartime food rationing since it does not contain dairy or eggs.

Oops, I made a vegan cake!

My family enjoyed my first Wacky Cake experiment so much that my mom made it for special occasions or to share with friends in need. We frosted it with a white icing, but the church cookbook recipe recommends peanut butter icing. My husband would have been sad to find an empty jar of peanut butter (he eats PB regularly, I do not), so I made a coffee-cocoa glaze.

Wacky Cake isn’t intensely chocolatey, but it’s light and airy and sweet. If you want to keep the vegan thing going, don’t add half and half to the glaze. Either way, you can’t go wrong but you might go wacky.

Wacky Cake

Wacky Cake
Adapted from Bettemae Ramsey’s recipe in Favorite Recipes, Faith Lutheran Church Women, Akron, OH, date unknown. Glaze adapted from The Weary Chef’s recipe for Easy Mocha Glaze Icing

Cake Ingredients:
1/2 cocoa powder
3 cups unbleached all-purpose flour (had to swap in about 1/2 whole wheat flour)
2 cups sugar
2 tsp. baking soda
1 tsp. salt
2 Tbsp. vinegar (I used apple cider)
2 1/2 tsp. vanilla extract
2/3 cup vegetable oil
2 cups cold water

Instructions:

  1. Pre-heat oven to 350℉.
  2. Grease a large baking pan.
  3. Sift the cocoa powder, flour, baking soda together into a large bowl. Stir in sugar and salt.
  4. The original recipe instructs one to make three holes in the dry ingredients. Add the vinegar to one, vanilla extract to another, and oil to the third.
  5. Pour over the cold water and lightly whisk until the ingredients are incorporated.
  6. Pour into the prepared baking pan and bake for about 30 minutes, or until you can stick a toothpick into the middle of the cake and cleanly remove it.
  7. Cool completely before frosting (or hack off a steaming piece of cake and frost for immediate consumption, like me).

Glaze Ingredients:
1 cup powdered sugar
2 Tbsp. cocoa powder
1 Tbsp. of coffee
Half & half: Enough to provide a nice consistency

Instructions:
Mix the cocoa, powdered sugar, and liquid until you like the flavor and consistency. I made this cake to share with kids, so I only added a hint of coffee and thinned it out to a proper consistency with half and half. You could use all coffee, or just use milk/cream/half and half as a liquid.

I’m Excited About These Lemon-Glazed Meltaway Cookies

I’ve been eating cookies for breakfast long before Zooey Deschanel made it quirky or adorkale or whatever at the Golden Globes. Except that no referred to it as an endearing meal choice. Maybe she’s changed this around for us breakfast cookie eaters, now.

When I worked at Josie’s Coffee Corner Cafe and Bakeshop in Fargo, ND I watched people swoon over these cookies called melting moments that we described as lemon shortbread. They were the smallest among the other cookies, yet this didn’t stop people from choosing them, sometimes by the dozen.

This may sound strange, but I never actually ate a melting moment. You see, I had a pumpkin cookie addiction. I tried really hard to only eat one cookie per shift and I always chose the cakey pumpkin cookies with cream cheese frosting.

Yesterday when I was flipping through an old church cookbook, I noticed a recipe for Melting Moments and knew I had to try them. They are simple to prepare and the cornstarch and powdered sugar gives them that unusual, melting texture. I’m really excited about these little cookies.

Lemon-Glazed Meltaway Cookies
Adapted from a recipe with no author in Favorite Recipes published by Faith Lutheran Church, Akron, Ohio

Ingredients:
1 cup of softened butter (I used salted)
1/3 cup confectioners (powdered) sugar
3/4 cup cornstarch
1 cup unbleached all purpose flour
Optional: 1 teaspoon vanilla extract (or almond)

Instructions:

  1. Cream the butter and confectioners sugar.
  2. Add the cornstarch and flour.
  3. Chill the dough until firm.
  4. Preheat oven to 350℉
  5. Roll the dough into little balls.
  6. Bake for about 15 minutes on a sheet pan lined with parchment paper. They will spread slightly during baking.
  7. Cool and glaze. I like tart lemon glaze, so I glazed them twice.
Glaze:
I made glaze from combining three tablespoons of lemon juice with the zest from one lemon, a splash of half and half, pinch of salt, 1 tablespoons of melted butter and 2 1/2 cups powdered sugar. If it’s too wet, add more powdered sugar. If it’s too dry, add more half and half or lemon juice.

This recipe is a hybrid of a few recipes and it seemed to work. If you want a more exact recipe, try this glaze from Tyler Florence.

A Post-Thanksgiving Apple Pie To Eat With Cheddar: A Recipe

For Thanksgiving, Jake and I visited our families in the Twin Cities where our parents spoiled us with lovely meals. My mother-in-law prepared her famous holiday morning egg bake and cinnamon rolls in a bundt pan, while my folks served turkey dinner with sweet potato casserole and my late mother’s favorite artichoke dip recipe.

Thanksgiving breakfast & gathering around my family’s table.

A downside to spending Thanksgiving out of town is not having a fridge full of turkey dinner leftovers. When we returned home, I wanted apple pie and so I made an apple pie.

Last year, culinary school ruined me for homemade pie crusts. There’s nothing inherently wrong with pre-made pie crust in the refrigerated section. I have used them for convenience’s sake and even found whole wheat versions at the Wedge Co-op that actually taste like butter, though you will pay for these. But the problem is that pre-made crusts often taste like rancid shortening, even when they are used well within their sell-by date.

This time, I just wanted a scratch-made pie or bust.

Last year in culinary school, I found myself in baking lab around the holidays. We cranked out so many pies that there wasn’t any time to be intimidated by making homemade pie crust. We were a pie-crust making machine.

My teacher taught us how to make pie crusts around the big, wooden baking table and we worked in tandem. I loved how she handled pastry dough with an air of unfussiness, yet they always turned out perfectly. Scone dough got beat in a large mixer with room temperature butter and I was instructed to cut the shortening into the flour with my fingers. This experience taught me that, although there is a method to the madness, pie crust can take more abuse than one might expect.

I adapted this recipe from my Williams-Sonoma Essentials of Baking cookbook which is very similar to the recipe we used in class. Even though I have a stand mixer, I like to make the dough by hand.

If you have extra pie dough, roll it out, cover it with the eggwash, sprinkle with cinnamon and sugar, and bake. It will be too tough to use as a pie crust, but perfect for a treat.

My First Apple Pie
Adapted from Williams-Sonoma Essentials of Baking

Double Crust Pie Dough
Ingredients:
2 1/2 cups unbleached all purpose flour
2 tablespoons granulated sugar
1/2 teaspoon salt

6 tablespoons shortening (I used vegetable, but I think you could substitute lard)

2/3 cup cold butter cut into small cubes (I always use salted butter since I desire a note of saltiness to my sweets. However, if all you have is salted butter, you could add less than 1/2 teaspoon of salt)
8-10+ tablespoons ice water

Instructions:
In a large bowl, combine the flour, sugar and salt.

Drop the tablespoons of lard into the bowl. Sprinkle over the cold cubes of butter.

Cut the fat into the flour mixture. A pastry cutter would probably be easiest but I just used my fingers and pinched the fat into the flour. When my fingers got tired, I used a couple of butter knives. You want to do this relatively swiftly, as you don’t want the fat to completely melt into the flour (the little balls of fat will make the dough flaky) However, don’t agonize over the process.

When you see the fat and flour form pea-sized crumbles, drizzle in the ice water. Although the recipe called for eight tablespoons of water, I added at least two-three extra.

My best advice is to start with eight tablespoons and mix the dough with a fork. If the dough is too crumbly, add an extra tablespoon at a time until you can form the dough into a ball.

As my culinary instructor mentioned, people frequently get thrown off making pie dough because they use too little water.

Divide the dough into two balls, making one a little bigger than the second. Form into discs, wrap in plastic wrap and chill until they are firm.

Roll out the pie crusts out on a floured surface. Gently drape them around the rolling pin to transfer to the pie plate, using the bigger one for the bottom crust and the smaller for the top.

Pie Filling Ingredients:
I like to build tall pies so I toss in extra apples. This amount doesn’t have to be exact.

8 granny smith apples (organic if you can find them and if they’re not too expensive)
1/4 cup brown sugar, packed
1 tablespoons lemon juice (I just juiced a whole lemon since I don’t mind extra tartness)
1 3/4 teaspoons cinnamon
1/8 teaspoon nutmeg
Pinch of salt
2 tablespoons of butter cut into small cubes
1 egg
2 tablespoons of heavy cream

Instructions:
Preheat oven to 400 degrees F.

Peel apples. To prevent browning, plop the peeled apples in a bowl of cold water with the lemon halves  left over after you juiced them.

Core the apples and slice them. Combine with the brown sugar, lemon juice, cinnamon, nutmeg and salt. You can either add the melted butter in now, or cube the butter and dot the apple mixture before you cover with a pie crust.

Pour into the pan lined with the rolled out pie crust and leave the excess liquid behind.

Top with the second pie crust.

Pinch the top and bottom crusts together and remove the excess dough from the edges. Tuck them in around the edge of the pie plate so you have a neat edge and seal. Crimp (as you can see, I forgot).

Feel free to cut out shapes from the extra pie dough you removed from the edges.

Mix the egg with heavy cream and brush the top of the pie. You can also just use heavy cream with no egg. If you don’t have a pastry brush, dab with a paper towel. Place any decorative pie shapes on the dough and brush them with the glaze.

Cut a couple of steam slits into the top of the pie.

Bake for 15-minutes at 400 degrees.

Reduce heat to 350 and bake for about 40 minutes or until the apples are tender. Test them by poking a knife into the steam vents. If the top seems to be browning too quickly or you don’t want it to brown further, cover with foil.

I like to enjoy each slice of apple pie with thin slices of melted sharp cheddar melted on the top. Jake prefers ice cream or whip cream.

The breakfast of champions.

Since I am new to pie-making, feel free to leave suggestions or tips. 

A Wheat Bread Recipe To Get Excited About

Two moves to two different states within the span of a couple years leaves me feeling disorientated at times.

This week in particular, I’ve felt homesick, but I’m not really even sure what for, anymore. Am I homesick for the Twin Cities or for Fargo, ND?  I think I just yearn for my familiar faces and places and I just haven’t found all of them in Iowa yet.

Baking is one of my favorite forms of therapy. There’s something soothing in taking the time to carefully measure ingredients and combining them in a specific order. Baking bread is also like a culinary form of meditation since one must patiently wait for the dough to rise.

Don’t skimp on this step. Just my culinary instructor told us in baking lab, let the dough to rise “once for flavor and twice for structure.” If you are impatient and rush through this step, you will end up with bland bread, dense bread, or both.

You will be rewarded for your patience. The wheat bread has a hint of sweetness and is not too heavy.

My favorite way to enjoy it is by toasting slices and slathering them in butter. Then, I add a drizzle of honey and a sprinkle of flaky sea salt.

We have the nicest nextdoor neighbors. This week, they removed our fall leaves from our yard when we weren’t looking so I brought over an extra loaf of wheat bread. They gave it high marks, so it must be good, right?

And when I’m in a really good mood, I save a tiny corner of toast for my dog who’s getting more patient at waiting for me to finish breakfast.

Whole Wheat Bread
Adapted from Chyrl Anderson’s recipe in Recipes from Rural America Published by NTCA’s Foundation for Rural Service

Ingredients:
1 package yeast
2 cups of warm water
3 cups unbleached all purpose flour
2 Tablespoons honey
2 teaspoons salt
1/2 cup hot water
3 Tablespoons olive oil
1/2 cup brown sugar
3 cups whole wheat flour

Directions:
In a small bowl, add the yeast to 2 cups of warm water. If the water is too hot, it will kill the yeast and if it’s too cold, it will not bloom.

After a few minutes, add the yeast and water mixture to a large bowl containing the honey, salt and all purpose flour. Mix until combined. Loosely cover and set in a warm place until it’s bubbly. I heat my oven and turn it off. When the oven cools to warm, it’s the perfect place to let dough rise.

Mix together the hot water, olive oil,  and brown sugar. Cool until warm and then add to the yeast sponge in the large bowl. Combine the whole wheat flour.

I mixed everything together with a stand mixer with a dough hook for about five minutes on a medium speed setting. If you don’t have a stand mixer, you can knead it by hand. The dough should be smooth and elastic, but not too sticky.

Form the dough into a ball and place in an oiled bowl or pan, turning it over so all sides are lightly coated. Cover loosely and allow to rise in a warm place until doubled.

When it’s doubled in size, knead the dough for several minutes and separate it into two loaves. If you are using loaf pans, place the dough in the greased pans. Otherwise, free form the dough into your desired shape and place on a lightly-oiled baking sheet. Cover loosely.

Let the dough rise one more time until doubled.

The original directions instructed me to bake at 375 degrees F. for 45 minutes or until done. My oven must run hot because I baked the loaves at 365 degrees F. for 30 minutes.

Cool completely before storing.

« Older posts Newer posts »

© 2024 Jeni Eats

Theme by Anders NorenUp ↑

Twitter
Visit Us
Follow Me
INSTAGRAM