Category: dessert (Page 2 of 6)

Lois’ Cream Puff Sticks

Oh, college.

I was a nerd. Let me count the ways:

Freshman year, I signed up for the quiet, substance-free dorm. Actually, my parents hijacked the process and requested the Centennial dorm for me. Fortunately, my first roommate ended up becoming one of my best friends all four years. She’s still one of the funniest people I know.

I didn’t have a drink until I officially turned 21 and stayed up past 1am. . . once. I only dated a few people and one of them cheated on me Mean Girls-style (seriously, it was just like out of the movie) at a Halloween party. She was dressed up like a Playboy bunny and I was probably sitting at home in my pajamas reading a book. I was like Taylor Swift. Not the award show, glamorous Taylor but the one she sang about wearing sneakers and sitting on the bleachers.

I may have been a nerd, but I was a happy nerd with the really fantastic friends.

For three years, I worked at the school as a Writing/Reading/Speaking Consultant. The woman who hired me was a saint for putting up with college Jeni (as was anyone else who hired me during or soon after college). Each year, she invited the staff over to her home for magnificent, home-cooked meals around Christmas and the end of the school year.

I especially remember a treat she made called cream puff sticks. I had never tasted anything like them and haven’t since. They are so delicate and airy that you’ll want to eat a whole cream puff plank. The dough also doesn’t contain sugar, making this treat ideal for those of us who don’t like sickly, sweet desserts. Lois was gracious enough to let me to share her recipe here, adding that when her grandchildren visit, they often request these cream puff strips for breakfast. This makes me so happy.

It’s the easiest, most elegant dessert you can prepare. Cream puff dough entails making pate a choux. Unlike cookie or cake dough, you cook it on the stove top and slowly add eggs. Don’t be intimidated by this dough because it’s actually simple to make.

Cream Puff Strips.jpg

Adapted from Lois Trachte’s recipe

Ingredients:
1 cup of water
1/2 cup of butter (1 stick)
1 cup flour
1/2 teaspoon salt
2 teaspoons vanilla extract
4 large eggs

Glaze:
Powdered Sugar
Milk or cream (I used almond milk)
Butter, a little dab
Vanilla extract
Salt, a pinch

Instructions

  1. Preheat oven to 450℉.
  2. Grease a large baking sheet, or line one with parchment paper.
  3. In a large saucepan, boil the water. Melt the stick of butter in the boiling water and turn off the heat.
  4. Stir in flour and 1/2 teaspoon of salt until the mixture forms a ball. Remove from heat and let it cool for a couple of minutes. 
  5. Crack all four eggs in a bowl.
  6. After mixture has cooled slightly, add vanilla extract. Vigorously stir in one egg into the dough at a time. Each time you add an egg, the dough will look strange and separate into pieces. Just keep stirring and it will reincorporate.
  7. Spread the dough into two strips on the baking sheet. The dough is sticky, so use the back of a spoon or offset spatula and do your best.
  8. Bake at 450℉ for 20 minutes. Reduce heat to 400℉ and bake for another 25 minutes. If the bottoms seem to be browning too quickly, reduce heat to 375℉ or remove from oven a little early. Cool completely before glazing.
  9. To make the glaze, mix about a cup of powdered sugar with a little milk. Keep adding milk until you like its texture. Add a splash of vanilla extract and a little pinch of salt to balance out the sweetness.
  10. Glaze the cream puff planks and cut into strips with a pizza cutter.

I Just Don’t Like Cupcakes

The other day I caught a Travel Channel show featuring a British tea house making cupcakes. For the next half hour, I found myself ruminating on why I hate cupcakes.

I didn’t always hate cupcakes.

Cupcake Roulette
Ten years ago, I lived in Minneapolis where gourmet cupcakes emerged into the food scene as I knew it. Rumours abounded about a woman who sold cupcakes in fancy flavors from a boutique once a week. They were so popular that they’d sell out if you didn’t get there before noon. These cost $5 each and I sometimes blew $20 on four small pastries, feeling very Carrie Bradshaw. But sometimes the cupcakes were dry and I got tired of playing cupcake roulette.

Style Over Substance
Cupcakes frustate me because their looks often deceive. Even though they are pretty, they’re often dried out inside. I think people overbake them or let them sit around for too long. I’m annoyed when bakeries spend so much time and effort making cupcakes look like dazzling jewels, yet take so little care to bake them correctly.

Frosting
I also dislike cupcakes because I dislike frosting. I don’t like that whip creme-based frosting on cheap, grocery store cakes or sticky-sweet buttercream. Cupcakes are usually covered in at least their bodies’ weight in frosting which I promptly remove.

Rise Of The Cupcakeries
In a recent conversation, a few of us found ourselves debating what a store might be called if it only sold cupcakes. Is “bakery” too general? Is cupcakery even a word? There are entire stores being built that only sell cupcakes and they even appear in stores that don’t typically sell food. The cupcake movement doesn’t seem to be slowing down and I just can’t avoid cupcakes.

Now, who wants a Cronut?

Leftover Easter Candy: Marshmallow Tart With Shaved Chocolate

I’m 28 years old and my folks still sent me an Easter basket. It was an unexpected and welcome surprise. I suppose one’s never too old to feel giddy about receiving a brightly colored wicker basket overflowing with chocolates and colorful hard candies from Abdallah’s. When I was growing up, my parents would let me tag along to this candy store in Burnsville, MN. We always bought my mom nicely-wrapped boxes of dark chocolate turtles for special occasions like her birthday and Mother’s Day. They were her favorite.

My folks still sent me Easter baskets in college. One year, I remember my roommates giggling as I unwrapped a chocolate Calvary portraying three crosses on a hill. I was confused, as I thought everyone received chocolate biblical scenes at Easter.

We found two solid milk chocolate bunnies this year. Neither Jake or I eat a lot of candy so I wondered to transform some of my Easter basket into baking projects.

Marshmallow pie came to mind as I thought of my chocolate bunnies. During my first year and a half in Fargo, I worked with a wonderful woman named Becky who told me about a marshmallow pie she always made for her father on his birthday. It’s been months since we’ve spoken of marshmallow pie, but I was still intrigued by the concept.

I remembered the basic pie preparation instructions shared and did a little extra internet research so I could create my own pie crust. Graham cracker pie crust recipes seem to be essentially the same, but I preferred this recipe by Saguaro on Food.com because it contained the least amount of sugar. I also adapted the pie filling from the blog Just Everyday Me because it adds real, whipped cream.

This unusual pie is refreshing. The marshmallow filling is light and fluffy and contrasts with the crunchy, sweet and salty crust. I don’t enjoy heavy and chocolate-laden desserts, but a small piece of this pie with hot coffee makes me feel little closer to heaven, especially on this snowy April weekend.

Marshmallow Tart with Shaved Chocolate Easter Bunny

Graham Cracker Crust

Ingredients:
9 whole graham crackers, crushed or blended into crumbs (1 sleeve)
5 Tablespoons melted butter, salted or unsalted
2 Tablespoons granulated sugar
1 pinch cinnamon
2 pinches of sea salt (about 1/4 teaspoon).

Instructions:

  1. Preheat oven to 350℉.
  2. Crush the graham crackers into crumbs. I used a blender, but you could use a food processor or place the crackers in a bag and crush them with a mallet or you hands.
  3. Place the crumbs into a bowl and combine with melted butter, sugar, cinnamon, and sea salt.
  4. Press the crumbs into the bottom of the pan and up the sides. I used a nonstick tart pan. If your pan is not nonstick, you may want to grease the pan and cover the bottom with parchment paper.
  5. Bake until golden brown. Cool.

Marshmallow Filling

Ingredients:
30 large marshmallows
1/2 cup milk (I used 1%)
1 cup heavy whipping cream
1/2 teaspoon vanilla extract
About 1 cup of grated chocolate. I used one, solid milk chocolate bunny

Instructions:

  1. Heat the marshmallows and milk together in a double boiler and stir until melted and smooth. If you don’t have a double boiler, create one by placing a larger bowl over a smaller saucepan of of simmering water. A double boiler will heat the mixture gently and prevent scorching.
  2. Allow the mixture to cool so that it doesn’t melt the whipped cream and chocolate shavings. To expedite the cooling process, plate the mixture in the freezer and stir occasionally.
  3. Add the vanilla extract to the heavy cream. Whip until it forms stiff peaks. Don’t over-whip or it will separate into butter.
  4. Once the marshmallow mixture is cooled, gently fold in the whipped cream and half of the grated chocolate. Pour into the tart shell. Sprinkle the top with the remaining shaved chocolate and place in the refrigerator to set.

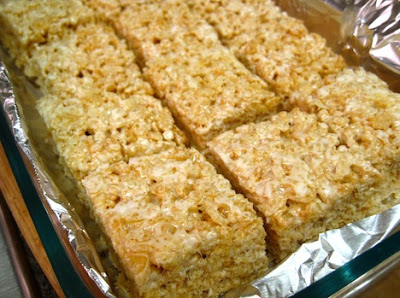
The Best Rice Crispy Treats Ever

Fargo operates a wonderful public library downtown and I love it for so many reasons. Let me count the ways. . .

The downtown location is spacious, contemporary, and well-stocked. Visitors can park for free for three hours in a lot across the street as long as they remember to ask a staff member to validate their ticket. There’s a small coffee shop near the entrance that smells like freshly-baked brownies and visitors are free to bring anything from this coffee shop into the library. Unlike bigger cities, new releases and best sellers often perch on shelves instead of waiting lists, and the fines are noticeably more affordable. On certain occasions, late fees are altogether waived or discounted if you donate canned goods.

When I visit the downtown library, I make a beeline for the cookbooks, of which there are many shelves. On my most recent visit, I picked up Deb Perelman’s The Smitten Kitchen Cookbook because I enjoy her food blog. Perelman’s recipes are creative without being pretentious and they are conducive to home cooking. Plus, her beautiful photography makes everything look enticing. There’s nothing I like less than examining a cookbook only to find that each recipe requires a massive number of ingredients, is filled with ingredients that are extremely expensive or difficult to locate, or includes 20-billion instructions.

Fortunately, Perelman’s recipes are quite approachable. One of the most simple recipes in her book is for Salted Brown Butter Crispy Treats, in which Perelman deviates from the original version by using a larger quantity of butter, browning it, and adding sea salt. Those who tried my version of Perelman’s treats described them as “Rice Crispy treats for adults,” and said they reminded them of “creme brulee.”

These treats only require three ingredients and they are ready to eat as soon as they cool enough to cut. Therefore, they’re an an easy dessert to bring to a party that will appeal to both adults and children. We served them plain, but you could also drizzle them with chocolate or enjoy them like my husband; spread with Nutella or peanut butter and nibbled while curled up on the couch watching Seinfeld.

Browned Butter and Sea Salt Rice Crispy Treats

Ingredients:
6 cups Rice Crispies (or puffed rice cereal)
1 bag (10 oz.) of plain miniature marshmallows
1 stick of butter, salted or unsalted, plus enough to grease the pan (I used salted butter and the specified amount of salt and did not find them too salty. If you are cautious, use a little less salt).
1/4 teaspoon of Fleur de Sel (you could use another type of course or flaky sea salt like Maldon, but I prefer Fleur de Sel because it’s so delicate).

Instructions:

  1. Grease interior of a 8 x 8 or 9 x 9 square pan (the treats will be a little taller if you use the smaller pan). If you have parchment paper, cut a piece to fit the inside of the pan. Grease the inside of the pan, insert parchment, and grease the exposed surface of the parchment.
  2. In a large pot, melt the stick of butter and cook gently over medium heat until it just turns golden brown and smells toasty. Turn off heat immediately because the butter can burn quickly.
  3. Add the bag of marshmallows and stir until they melt in a smooth substance. Turn the heat back on to low if the pot cools too much to melt the marshmallows.
  4. Add salt and stir in the rice crispies until evenly coated.
  5. Pour into the greased pan. Quickly spread until even with a buttered spatula. Don’t press them into the pan with too much force, otherwise they will become dense.
  6. Cool. Loosen edges. Invert onto a cutting board and cut into desired-sized pieces with a sharp knife.

As Promised: A Recipe For Pistachio-Crusted Citrus Cheesecake

In culinary school last semester, I spent a couple months in baking lab and bragged about making this fantastic pistachio-crusted citrus cheesecake.

I even promised to share the recipe, soon. Apparently, “soon” means five months later.

It’s worth the wait.

Typically, I don’t order cheesecake because I find it overly rich and cloyingly sweet. In my worst nightmares, I’m being forced to eat a brick of cheesecake in a flavor like mocha-nut-fudge-bomb, or something that might be served at The Cheesecake Factory.

This cheesecake is much lighter and gently flavored with citrus zest, while a thin nut crust replaces the heavy cookie crusts. For those like myself who struggle eating super sweet desserts, I’d recommend serving this cheesecake with a tart berry sauce.

When we made this cheesecake in class, the student in charge of purchasing bought small bags of shell-on pistachios. I spent a long time shelling the nuts until we reached one pound, so buy shelled pistachios if you can. If the nuts are salted, they’ll add further contrast to the sweet cream cheese filling.

Late is better than never, so here’s the recipe, as promised.

Pistachio-Crusted Citrus Cheesecake
Adapted from the recipe for Pistachio Citrus Cheesecake, recipe 35.22, published in On Cooking: A Textbook Of Culinary Fundamentals, 4th Edition.

The original recipe makes 4, ten-inch cakes. I halved the recipe for home use. Use any type of citrus zest and feel free to combine different types of citrus zests. Grate it finely or further chop with a knife because large pieces of zest, though pretty, will remain chewy. The original recipe also instructs one NOT to use springform pans. I suppose springforms might ruin the delicate nut crust.

Ingredients:
Butter, melted (salted or unsalted). Enough to coat the insides of the pans.
1/2 lb pistachios, roughly ground. We used a food processor.
3 lb. 5 oz. cream cheese, softened
1 3/4 oz. flour, sifted
1 lb. sugar
9 eggs
5 oz. heavy cream
4 Tb. citrus zest, finely grated.

Instructions:

  1. Preheat oven to 325℉.
  2. Generously smear the insides of the cake pans with melted butter. This will help the nuts stick to the pan and form a crust.
  3. Evenly cover the buttered cake pan with nuts, including the bottom and sides. 
  4. Beat the softened cream cheese until light and smooth. Then, mix in the sifted flour and sugar. 
  5. Beat in the eggs, two at a time. 
  6. Stir in the cream and citrus zests. 
  7. Pour mixture into prepared cake pans.
  8. Place cake pans in a larger pan. Create a water bath by filling the larger pan with about an inch of water. 
  9. Bake for about 45 minutes or until the cheesecake is set. Add more water to the water bath if it evaporates.
  10. Cool, cut, and serve the cake. We cut slices from the pan and served, but you could invert the cheesecake onto a platter and serve crust-side up. 
« Older posts Newer posts »

© 2024 Jeni Eats

Theme by Anders NorenUp ↑

Twitter
Visit Us
Follow Me
INSTAGRAM