Tag: Chicken (Page 2 of 2)

Comfort Food After the Storms: That Swiss Chicken Casserole My Mom Made

Four evenings of storms passed and our refrigerator remained running for three, so I’m cooking again.

The tornado warnings occurred on Monday, followed by severe thunderstorm watches and flash flood warnings. Many farms, parks, homes and campgrounds in North Iowa are experiencing flooding. Our block is located near a creek and we’re thankful it’s remained dry this week.

I wanted the first meal I prepared after our post-storm fridge dump to be simple and comforting. For whatever reason, a casserole my mom used to make popped into my head. It combined chicken breasts, swiss cheese, white wine, and stuffing.

It turns out that this dish is called “Swiss Chicken” or the vague and partially misleading “Chicken with white wine sauce.”

Swiss Chicken casserole is not gourmet. It won’t win any beauty pageants and contains condensed cream of [pick your poison] soup, but it made me happy and it tasted like my mom’s. Comfort food after the storms.

Swiss Chicken
There are a million recipes for this dish and they are nearly identical. I worked from The Girl Who Ate Everything’s post.

Swiss Chicken

Ingredients:
4-6 chicken breasts (or enough to fit into a large baking dish).
1 slice of swiss cheese per chicken breast
1 can of cream of chicken/mushroom/celery soup
1 cup milk
1/4 cup white wine
Black pepper
1 box of stuffing
Melted butter, enough to lightly drizzle over the stuffing

Instructions:

  1. Pre-heat oven to 350℉.
  2. If you are using smaller chicken breasts, pound the thicker part so it’s more uniform in size. If you are using large chicken breasts, slice them in half so you have two thinner halves of equal size.
  3. In a lightly oiled baking dish, line-up the chicken breasts in a single layer.
  4. Top each piece of chicken with swiss cheese.
  5. Combine the soup, milk and wine. Sprinkle in some black pepper.
  6. Pour soup mixture over the chicken.
  7. Sprinkle the stuffing on top and drizzle with melted butter.
  8. Cover and bake for 40-minutes. Uncover and bake for an additional 10-15 minutes or until the chicken is cooked and the stuffing is golden brown. You will need to adjust the length of time depending on how thick your chicken breasts are.

What Is This “Man-Pleasing Chicken”?

I can hardly even say the name of this dish without gagging because it’s just. . . so. . . .awful!

“Man-Pleasing Chicken” is a Pinterest superstar. People who prepare and write about it don’t just like it, they LOVE it and speak of it in hyperboles. I took note of the dish, but mostly ignored it until a few friends recommended it as one of those Pinterest recipes that isn’t just pretty, but actually works.

I did some quick internet research and found the blog Witty in the City published the most-pinned post which is an adaptation of the recipe from the I Love Trader Joe’s Cookbook. She describes this chicken as So Good it Can’t Be Described, Explosion on Your Taste Buds Chicken.” 

Holy crap, what?

On Monday after we had just returned from the Twin Cities, I wanted to prepare something simple yet homey, so I gave Man-Pleasing Chicken a try, adding my own touches. Blogger Trial in Food attempted the dish twice and recommends bone-in, skin-on chicken thighs. After trying the recipe with bone-in, I think boneless would work just fine.

I thought the original sauce tasted overly sweet and one-dimensional, so I added freshly grated garlic, soy sauce, lots of black pepper, and a couple pinches of smoked paprika. Perfect. Then, I served the chicken with bok choy and steamed rice and french bread to soak up the sweet and savory mustard sauce.

Here’s my take on Man-Pleasing Chicken.

Jeni & Jake-Pleasing Chicken
For crisper skin, you could try searing the chicken before placing it in the baking dish or broiling the chicken after baking. I only broiled for a few minutes before I suddenly realized that I wasn’t sure if you can broil in glass pans. You may have to adjust the cooking temperature and cooking time depending on your oven and baking dish. 

DSC_0072

Ingredients:
6 bone-in, skin-on chicken thighs
1/2 cup Dijon mustard
1/4 cup real maple syrup
1 tablespoon rice wine vinegar
1 clove of garlic, grated
3 tablespoons of soy sauce, or to taste
Black pepper
Smoked paprika, two pinches

Instructions:

  1. Pre-heat oven to 450℉.
  2. In a bowl, whisk together the mustard, syrup, vinegar and garlic.
  3. Add about three tablespoons of soy sauce, or enough to balance out the sweet maple syrup.
  4. Season with black pepper and a couple pinches (or more) or smoked paprika. Don’t be afraid to taste the sauce.
  5. Place the chicken thighs in a baking dish. Pour the sauce over the chicken and flip the thighs around so they are evenly coated. Make sure they are facing skin-side up while baking.
  6. Bake for 20-minutes and baste with the sauce.
  7. Bake for another 20-minutes or until the chicken is cooked through. If you have a thermometer, look for an internal temperature of 165℉. I cut into a thigh to make sure it was cooked and the juices ran clear.
  8. If you want the chicken to be browner, broil on high until the skin is crisp and bubbly.

Clearance Grocery Item Taste Test: Giada Di Laurentiis Pork Chop Milanese Box Kit

I like prowling grocery stores for clearance items. You never know what you will find.

Some of my recent clearance finds have included cans of mango nectar for .16 each, cocktail rye bread, cans of seasoned black beans, and random variety of beers by the bottle at the liquor store.

This week, I found boxes of Giada De Laurentiis Pork Chop Milanese Box Kits at Target. I see Target carries her expansive line of food products and I have never tried one so I grabbed a kit for only $1.74 (regularly priced $3.49).

The box comes with pouches of lemon thyme risotto, seasoning mix, and seasoned breadcrumbs. You must add your own meat and suggested lemon wedges. Since I already had boneless-skinless chicken breasts in my kitchen, I substituted them for pork chops and pounded them flat myself.

Giada Kit

I made a few more adaptations:

  • Sautéed diced onion along with the arborio rice before adding the water and seasoning pouch.
  • Added some extra grated parmesan cheese to the finished risotto
  • Instead of following the directions to coat the meat in the seasoned breadcrumbs, egg, and again in the seasoned breadcrumbs, I went the more traditional route. I first dredged the meat in flour I seasoned with salt, pepper, and garlic powder. Then, I dipped in the egg and into the box’s seasoned flour. Then, I placed the breaded cutlets in the freezer briefly to set up.

So, how did it turn out?

chicken milenesa

Taste
Not bad. The rice really did have a tart lemony flavor that didn’t taste artificial. Although this is real arborio rice, it looks more like minute rice. This may be due to the rice’s seasoning pouch which includes a lot of dried herbs that appear anemic and lend an Uncle Ben’s appearance. Also, the cooking method instructs you  to toast the rice, add all of the water, and simmer until cooked (stirring occasionally).

The breading was actually fine in texture. I found it tasted bland and had to add a lot of salt to the cooked cutlet. If you use this kit, I’d suggested seasoning the meat and also adding salt to the breading. I didn’t love the dried thyme and basil which added kind of a noxious flavor. Not inedible, but a little one-note, though you might like them. Spritzes of fresh lemon juice helped counteract these flavors. 

Final Verdict
Acceptable, especially for the clearance price. The rice tasted better and more natural than it looked and was the most flavorful component to the kit.

Would I buy it again?
No. I like my homemade cutlet breading better because I can season it exactly the way I like. To make this dish, you have to set up your own breading station anyway, so it won’t much extra effort to seasoning your own flour and breadcrumbs. I keep it simple with the flour mixture, but might add salt, pepper, minced fresh parsley and grated parmesan to the breadcrumbs.

Her original Pork Milanese recipe is on the Food Network website.

Have you tried any interesting grocery store clearance items lately?

Brined & Roasted Chicken Legs for Two (Adapted from The Pioneer Woman) + Curry Mayo

I was a hesitant Pioneer Woman fan.

When her cooking show first aired, I wasn’t sure I liked her. Soon, I found myself watching her show with surprising regularity and setting my DVR to record it. And when she made those darn hand cookies, well, I just found myself wishing I could make hand cookies with her, too.

I recently watched an episode where Ree prepared Spicy Roasted Chicken Legs and decided to give them a try even though Jake’s not crazy about chicken pieces with bones. He prefers boneless-skinless chicken breast, which I hate. Slowly but surely, I’m trying to change his perspective by feeding him as delicious chicken thighs as I can prepare. He may still prefer white meat, but at least he doesn’t hate those thighs anymore.

I needed to thaw my chicken legs and remembered how Danelle, of My Total Perspective Vortex suggested defrosting meat in brine. I based my brine on Michael Ruhlman’s Quick Brine Recipe and let the chicken soak for two hours. This was enough time to ensure the meat was juicy and flavorful from the inside-out.

A Cook’s Notes
The excess butter may drip onto the pan and smoke. I transferred the chicken legs onto a clean pan and reduced the heat to 375℉ to avoid setting off my smoke alarms. After they cooked for 1/2 hour, I broiled them until the skin was crispy.

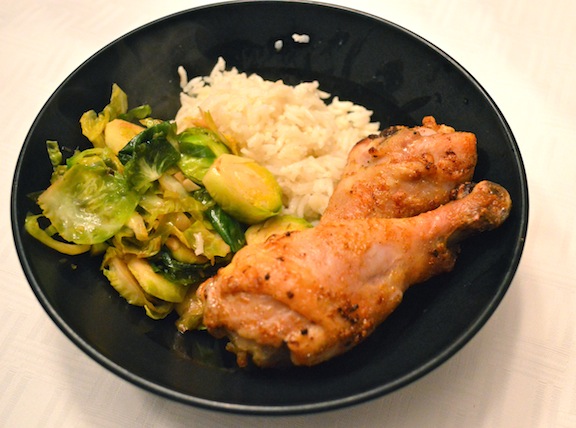
I served the chicken with basmati rice cooked in chicken stock with sautéed onions + sliced brussel sprouts sautéed and then steamed until tender with Asian flavors like ginger, garlic, soy sauce, and a little sugar. I also whipped up a quick curry mayo for dipping. 

Pioneer Woman Chicken Legs

Here’s my take:

Ingredients:
6 chicken drumsticks (1 pack)

Chicken Brine:
5 cups water
2.5 Tablespoons of salt
1 Tablespoon sugar
1 bay leaf
Tablespoon dried sage

Chicken Butter:
1/2 stick butter
1/3 teaspoon seasoned salt
Cayenne pepper, a good dash
1 teaspoon hot madras curry powder
Lemon juice, about two tablespoons

Our Favorite Curry Mayo for Dipping
Mix together mayonnaise (could substitute greek yogurt, sour cream, or a combination), hot madras curry powder, cayenne, garlic or garlic powder, a spritz of lemon juice, and a little dash of sugar. We like it spicy so I use a lot of curry and cayenne.

Instructions:

  1. Prepare the brine for the chicken by mixing the water, salt, sugar, bay leaf and safe until combined. Mine doesn’t follow Ruhman’s Quick Chicken Brine in exact proportions because I can’t do math, but it’s close enough. Allow the chicken to soak in the brine for a couple of hours. Remove the chicken and pat dry.
  2. Prepare the chicken butter by melting the butter, salt, cayenne, curry and lemon juice in a small saucepan. I love hot Madras curry and add it to everything, but you can use whatever seasonings you like.
  3. Swish the chicken legs around in the butter and place them on a baking rack set on a baking sheet. Baste with butter, again.
  4. Bake at 400 for 30 minutes. You might need to replace the pan underneath and reduce heat to 375 if the butter and juices smoke too much.
  5. If the chicken isn’t browned enough after cooking, broil until the skin is crispy and golden brown.
Newer posts »

© 2024 Jeni Eats

Theme by Anders NorenUp ↑

Twitter
Visit Us
Follow Me
INSTAGRAM