Tag: appetizer

Not Quite My Mom’s Artichoke Dip

Way Better Snacks sent me a complimentary box of chips to try – I did not agree to write a blog post in exchange for the chips but I am mentioning them below. 

My mom’s artichoke dip made an appearance every Christmas.

Her version only contained canned artichoke hearts, mayonnaise, garlic powder, onion powder and parmesan cheese which she baked the dip until bubbly and kept warm on a hot plate. We always ate the dip with water crackers. In fact, artichoke dip-time was the only time we saw water crackers so they were super special.

This dip never lasted long. I seem to remember it was one of the foods my cousin Brian and I fought over for leftovers. Whoever happened to be the college student at the time got to take them home.

Jake is a die-hard Vikings fan and so I made my own version of mom’s artichoke dip to commemorate the Viking’s first preseason game. Of course, I kept the mayonnaise (Hellman’s for me), but swapped fresh garlic and onion for powdered, and added grated carrot, herbs, and a local jalapeno pepper from the farmers market.

Minneapolis-based company Way Better Snacks found me on Twitter and kindly sent us a whole box of their gluten-free, sprouted corn chips. After enjoying them ourselves and bringing them to parties, we polished off our last bag eating this dip.

artichoke dip

Ingredients:
2 cans of artichoke hearts, whole or quartered
1 small carrot, peeled and shredded
1 jalapeno, chopped into small pieces. Keep some of the seeds and ribs if you want it extra spicy.
2-3 tablespoons minced or grated onion
1 clove garlic, minced
1 handful parsley, finely chopped
1 handful chives, finely minced
3/4 cup mayonnaise
1/4 cup cream cheese, softened
1/2-1 cup shredded or grated parmesan cheese ( or a mixture of whatever you have on hand).
1 dash white pepper
Black pepper, to taste

Instructions:

  1. Pre-heat oven to 375℉.
  2. Cut artichoke hearts into bite-sized pieces. Gently squeeze to remove the extra liquid.
  3. Mix artichokes with shredded carrot, jalapeno, onion, parsley, chives, garlic, mayonnaise, cheese and softened cream cheese.
  4. Stir in cheese. My mom’s recipe calls for 1 cup of shredded parmesan cheese, but I added 3/4 cup of parmesan and swiss because they were available in my fridge.
  5.  Season the dip with white pepper and black pepper to taste.
  6. Bake uncovered for about 30 minutes or until the dip is bubbly and golden brown around the edges.
  7. Serve with your favorite chip, cracker, or crostini.

I’m Smitten With Smitten With Squash: Layered Greek Tzatziki Dip

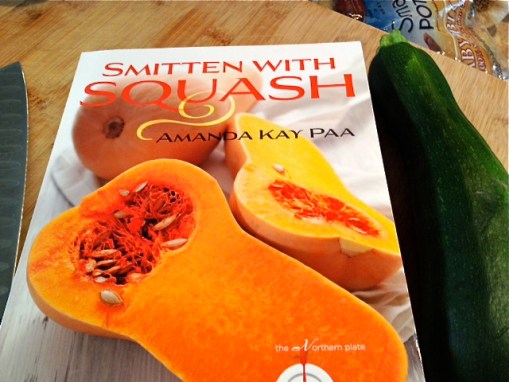
I’m smitten with Smitten With Squash, Amanda Paa’s new cookbook. She’s a Twin Cities resident who also blogs beautiful recipes at Heartbeet Kitchen.

Just as the book’s description says, Smitten With Squash is truly a celebration of this diverse and under-appreciated vegetable.

It seems that Midwesterners get inundated with zucchini and yellow squash in the summer and winter squash ranging from acorn to delicata in the fall right up ’till the winter. I almost can’t get enough squash and appreciate how this cookbook offers over seventy ways to prepare squash for breakfast, lunch, dinner and even dessert. It’s probably the best available cure for those suffering from squash fatigue.

Squash

For those who are allergic to gluten, each recipe can be prepared gluten-free if desired. Amanda shares her favorite gluten-free flour substitute so everyone can make her baked goods like Sweet Delicata Pie With Pecan Praline (p. 125) and Chocolate Coconut Zucchini Bread (p. 62). My good friend introduced me to chocolate zucchini cake and I’m excited to try Amanda’s version.

Amanda has graciously given me permission to share one of her cookbook’s recipes here on Jeni Eats. It was hard to choose my first recipe, but I decided to prepare her Layered Greek Tzatziki Dip (p. 18) with a beautiful North Iowan zucchini I bought at my local Mason City farmers market.

This dip is so refreshing because it’s perfectly fresh with seasonal vegetables, herby with dill, basil, and parsley, and it strikes an addicting balance with lemon-flecked greek yogurt and garlicky marinated vegetables.

Jake and I are storing the yogurt and vegetable mixtures in separate containers and layering them upon serving, since it’s just for the two of us. Amanda notes that one can use a combination of any herbs and prepare the dip a day ahead.

Layered Greek Tzatziki Dip
From Smitten With Squash by Amanda Kay Paa. Serves 8-10 as an appetizer. 

DSC_0129

Marinated Vegetables
1 cup finely chopped zucchini
1 cup finely chopped cucumber
1/2 cup chopped canned artichokes
1 1/2 cups chopped cherry tomatoes
1/4 cup pitted chopped kalamata olives
2 tablespoons olive oil
2 cloves garlic, minced
2 tablespoons chopped fresh basil
1/4 teaspoon kosher salt
1/4 teaspoon black pepper

Dip
Zest & juice of 1 lemon
16 ounces light sour cream
1/2 cup Greek yogurt
1/4 cup chopped fresh parsley
1/4 cup chopped fresh dill
2 cloves garlic, minced
1/2 teaspoon kosher salt
1/4 teaspoon black pepper

Toasted pita wedges or tortilla chips for serving (I made a batch of Smitten Kitchen’s pita bread and toasted my own wedges in a 400℉ oven with olive oil, salt and pepper until golden brown).

Instructions
Mix together all of the marinated vegetable ingredients and allow them to sit for at least one hour. The flavors will develop the longer they mingle.

When you are ready to assemble the dip, drain off any extra liquid from the vegetables. Set aside 1/4 cup of the vegetables. If you are preparing the dip for a party, layer the yogurt and vegetables in a clear, round serving bowl, starting with the vegetables. Finish by topping the last yogurt layer with the reserved 1/4 cup vegetables in a circular mound.

You can also mix the vegetable and yogurt mixtures together, or layer them as individual portions if you are not serving a group.

Ally’s Virtual Baby Shower: Little Cream Puffs With Egg Salad

I’ve attended plenty of baby showers but this is my first virtual shower. Iowa bloggers Stephanie of Been There Baked That and Yudith of Blissfully Delicious are co-hosting this virtual baby shower for Ally, of Ally’s Sweet & Savory Eats. I’ve enjoyed following all three of their food blogs and got to meet Ally and Stephanie at a blogger meet-up last fall. Ally graciously connected me with this group of bloggers and I’m excited to contribute a recipe to her virtual shower. We send our congratulations and best wishes to Ally and her family.

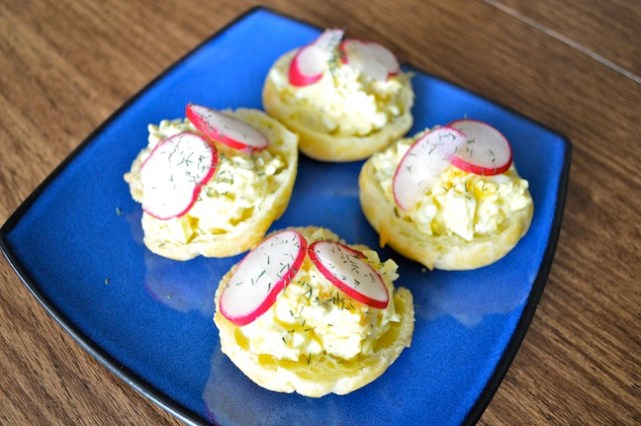
I recreated the savory, salad-filled cream puffs that I used to serve at Josie’s Coffee Corner Cafe in downtown Fargo, ND. Customers looked forward to the days the owners offered them as summer, chalkboard specials.

Filled Puffs

Cream puffs are made from pate a choux, a dough you begin preparing on the stove top. I made it for the first time when I baked Lois’ Cream Puff Sticks and was happily to find it wasn’t as difficult as I anticipated. Most recipes for cream puffs are essentially the same. Really precise recipes will instruct you to weigh the ingredients and measure out a cup of eggs. I’ve followed less precise recipes with good results.

For this batch, I followed Steamy Kitchen’s recipe and made my own piping bag from a ziplock.

Piping Bag

You can also fill these pastries with sweet foods like fresh whipped cream and berries. I like making my pate a choux dough with very little (or no) sugar in either a sweet or savory application, but you could certainly add more sugar.

DSC_0031

Cream Puffs Ingredients:
1/2 cup water
1 stick butter
1 cup flour
4 large eggs
1/2 teaspoon sugar
1/2 teaspoon salt

Instructions:

  1. Preheat oven to 425℉.
  2. In a saucepan, melt the butter in the water over medium heat.
  3. Stream in the flour and incorporate it into the water-butter mixture by stirring quickly. Let the dough cook briefly and remove from heat.
  4. Allow dough to cool until it’s warm. For quicker cooling, transfer dough to a stand mixer bowl or wait longer before adding the eggs. If you add the eggs when the dough is too hot, they will scramble.
  5. Once the dough is not screaming hot, quickly stir in one egg at a time. Don’t be alarmed when the dough becomes slippery and separates. Just keep stirring and it will come together.
  6. Stir in the salt and sugar.
  7. Pipe the dough onto a greased baking sheet (or one lined with parchment) or drop by the spoonful. Leave a little room for them to expand. Try to make the dough balls the same size and squish down any points to avoid burning.
  8. Bake for about ten minutes. Reduce heat and bake small cream puffs for about 20 minutes until they are puffed and golden brown. Remove earlier if you think they will burn. Larger puffs may take about 30 minutes.
  9. Final words of advice: Try not to open your oven too often, otherwise you’ll release the heat. If you undercook the cream puffs, they will deflate and have a gummy texture inside. Look for a pronounced golden brown color.
  10. Cool completely before storing in a bag or container. I store them in the fridge after a day.

Jeni’s Favorite Egg Salad
Egg salad is another food that we made so often in culinary school that I can practically make in my sleep. I never measure, but add whatever I like and taste as I go. Here is my not very precise method:

DSC_0028

Ingredients:
Hard boiled eggs
Mustard
Mayonnaise
Onion, finely minced or grated
Celery, finely chopped
Pickle, your favorite variety finely chopped (or relish). I used part of a sweet and spicy pickle spear.
Salt
Black Pepper
White Pepper
Dill

Instructions:

  1. Prepare as many hardboiled eggs as you’d like. I used six for a small bowl of egg salad. It’s an adequate amount to fill one batch of cream puff halves. I put the eggs in a saucepan and cover with cold water. I bring them to a boil, remove the pot from heat, cover and let sit for about 12 minutes. Then, I submerge them in ice water until cool and peel.
  2. Cut eggs in half. Add the yolks to the bowl and chop the whites.
  3. Add a couple dollops of mayonnaise, a good squirt of mustard, and minced onion, celery and pickle. Season with salt, black pepper, white pepper and dill.

Grandma Dorothy’s Hot Crabmeat Sandwiches: Oops I Made Crabby Snacks!

This is the eighth installment in my series in which I cook all eleven recipes I found my grandmothers had submitted to their old church cookbooks. Previous recipes include Rice PilafSalad with Cashew NutsHam & Sour Cream CasseroleOld Fashioned Cauliflower SlawApricot Jello Salad, and Ship Wreck casserole (the one my mom hated). 

Oops, I made crabby snacks.

The next recipe in this series comes from Grandma Dorothy, my mom’s mom. We spent a lot of time at their Cuyahoga Falls home where I played on their tree swing and spent hours in their attic looking at antique post cards. She gave me my first taste of coffee (which I promptly spit out) and read us books. She always kept a filled candy dish and taught me how to make homemade mashed potatoes.

This weekend I asked my Facebook fans which of my grandma’s recipes they’d like to see me make next and received the most feedback about crabmeat sandwiches.

First, A Mystery
Before I could start, I had to figure out what on earth is Velacta cheese?

DSC_0048.jpg

I could not find information online for “Velacta Cheese” or even “Velacta.” However, I found an MLM company Velata that sells kitchen products, fondue sets, and processed cheese spreads. A reader pointed out that Velata is owned by Scentsy whose website says Velata was introduced in 2012. This made me wonder if Scentsy bought an old company’s line or if Velata is a new brand. Unfortunately, the company does not list a corporate phone number and has not returned my email yet.

Readers wondered if Dorothy actually meant Velveeta, with Velacta being a typo. I went with this assumption because Velveeta came into existence long before the 60’s and 70’s and I would have only been able to purchase Velata by mail ordering it from a direct sales representative.

Canned Crab
I live in a smaller Iowan town and we don’t have a large selection of seafood. I could not find frozen crab so I chose this canned variety.

DSC_0049

Cans ranged from $2.99-$10, with jumbo lump being the most expensive. This can cost $5. The meat smelled unappealing and didn’t taste to great out of the can, either. If I had found frozen lump crab, I’m assuming it would have cost more than $10. Would I really have wanted to mix a higher quality product with Velveeta?

Crabby Snacks
I soon realized these sandwiches were actually a variation of the appetizer known as Crabby Snacks/Crabbies/Crab Bites. Jackie Weaver pushed this retro dish back into the spotlight when she mentioned Crabby Snacks in the film Silver Linings Playbook.

I have to confess I made some adaptations:

  • I cut the recipe in half so I didn’t waste a whole stick of butter.
  • I substituted butter for Oleo because I just can’t.
  • I substituted sliced bread with the crusts cut off for buns because I totally missed that part when I went grocery shopping.

Crabby Snack

Notes On Preparation 

  • Velveeta does funny things when you try to melt it with butter. It may separate into little globules so stir hard, and it will eventually form a paste.
  • I rinsed the crab before stirring it into the cheese because that smell.

Concluding Thoughts
These crabbies tasted better than we anticipated. This is not saying the canned crab meat tasted good, but that its flavor was mostly masked by the Velveeta mixture.

While I liked the idea of broiling each sandwich with a slice of fresh tomato, this turned out to be better in theory. The tomato slice blocked the cheese from getting golden brown and the underlying texture was unappealing.

Would I make this again? No. But it was fun to finally try this iconic retro appetizer. I have a hard time moving beyond the flavor of the canned crab lumps. If you like tuna fish, you might not feel too bothered and even Jake said he didn’t mind the crab’s flavor. I’d prefer surimi’s flavor (fake crab) to this canned product, though I typically don’t like its texture when it’s cooked. It reminds me of paste.

Have you ever eaten Crabby Snacks? How does your recipe (or your family member’s recipe) vary? What do you know about Velacta?

© 2024 Jeni Eats

Theme by Anders NorenUp ↑

Twitter
Visit Us
Follow Me
INSTAGRAM