Category: vegetarian (Page 2 of 4)

Creamy Chopped Eggplant Dip

I have a long-held fascination with eggplant.

It all started with food television. Growing up, I watched in awe as chefs prepared this strange, spongy vegetable. Sometimes they roasted it and sometimes they fried it. Either way, I just knew that someday I would love eggplant and I was right.

Eggplant just wasn’t a vegetable that appeared on my family’s table. . . or any other family that we visited’s tables. I didn’t see it at church picnics or soccer team potlucks. Maybe eggplant has become more popular in the kitchens of the Twin Cities’ southern ‘burbs. It’s so good and so versatile.

Earlier this year, I watched the episode of Trisha Yearwood’s (my childhood hero) cooking show on Food Network in which Nadia Comaneci and Bart Conner were special guests. Nadia prepared this simple eggplant dip called Salata de Vinete that caught my eye. I whipped together this dip based upon what I remembered seeing her prepare during this episode.

Jake and I liked the dip so much that it’s already gone. After we enjoyed it for dinner, I polished off the leftovers for breakfast and am contemplating preparing a second batch.

Creamy Chopped Eggplant Dip
Adapted from Nadia Comaneci’s recipe for Salata de Vinete. Use as many eggplants as you like. I’d recommend small-medium sized eggplants so they’ll roast faster and have smaller seeds, but use what you have. 

DSC_0118

Ingredients:
Eggplant
Olive oil
Salt
Onion, finely diced (as much as you like)
Garlic, powdered or freshly grated
Salt, to taste
Black pepper, to taste
Mayonnaise (can substitute greek yogurt or sour cream).
Lemon juice, to taste
Dill, dried or fresh
Smoked paprika or my favorite – half sharp Hungarian paprika, a dash or two

Instructions:

  1. Pre-heat oven to 400℉.
  2. Wash eggplants. Prick several times with a fork or knife so they don’t explode while baking. Rub with olive oil and sprinkle with salt.
  3. Roast eggplants until they are soft inside and blistered outside. Flip a few times during cooking. This will take about 40-minutes for small eggplants and longer if they are larger.
  4. When the eggplants are cool enough to handle, peel off the skin and remove the stem. Let any liquid drain away from the eggplant.
  5. Chop into small pieces. If you want a smoother texture, chop finer.
  6. Combine chopped eggplant with red onion and a couple dollops of mayonnaise. Start with a little bit of each and add as needed.
  7. Season with garlic powder or grated garlic, paprika, salt, pepper, dill and lemon juice, to taste.
  8. Serve with toasted pita bread.

Beet & Goat Cheese Flatbread

I love baking homemade pizza and homemade pizza is Jake’s favorite.

This week, I found beets at the farmers market and eagerly bought a couple of bunches. We ate the leafy beet greens right away. If you haven’t tried them, cook them like you would any other green. I don’t blanche the tops because they’re tender and wilt quickly like spinach.

Kale is the green everyone talks about, but we enjoy beet greens more. I toss them into sautéed onion and garlic and briefly wilt them in soy sauce and honey or maple syrup for a sweet and salty treat.

Beet Greens

For a special midweek treat, I prepared this beet and goat cheese flatbread. I baked my favorite, thin crust pizza dough recipe and spread it with goat cheese flavored with garlic scapes. Then, I sprinkled over diced beets and green onion. Beets and goat cheese is one of our favorite combinations and it brightened up our week.

Beet and Goat Cheese Flatbread
Makes two large but very thin flatbreads.

DSC_0101

How To Prepare the Garlic Scape Goat Cheese
Combine a large 10 oz. package of plain goat cheese with enough milk or cream to make it spreadable. Add minced garlic scape. The flavor of the scape is strong so I used a handful. If you can’t find garlic scapes, you could add minced garlic, green onion, chives, dill, and/or parsley.

How To Cook the Beets

Beets
I cook beets by simmering them in water because I first learned to cook them this way, though many prefer to roast. Be aware that beets will stain your cutting board. Here’s my simmering method:

  1. Clean the beets and remove most of the stem.
  2. Place them in a pot and cover with cold water. Bring to a boil and simmer until they are tender enough to easily insert a knife into the center.
  3. Drain and cool until they’re cool enough to handle.
  4. Gently peel off the skin and remove the stem and tails.
  5. Slice or dice however you wish.

Preparing the Flat Bread:
Adapted from the recipe Lahmacun published by Saveur. 

Ingredients:
1 package of quick rise yeast
1 teaspoon sugar
3/4 cup warm water
2 cups flour
1 teaspoon salt
1 tablespoon olive oil

Instructions:

  1. In a small bowl, combine the warm water, yeast and sugar. Hot water will kill the yeast. Allow to sit and bloom until it bubbles.
  2. Add the flour and salt to a large bowl. If preparing by hand, make a well in the center of the flour and add the yeast mixture and olive oil. Gradually stir until the dough forms a ball. If using a stand mixer, add the yeast-water mixture and oil to the flour on low and mix with a dough hook until the dough pulls away from the sides and forms a ball. If it’s too dry, slowly stream in a little water. If the dough is too soft and sticky, add a little flour. Knead or mix at a higher speed until the dough is smooth and elastic and not too sticky.
  3. Form dough into a ball and place in an oiled bowl. Loosely cover and place in a warm location until it’s doubled in size.
  4. Punch down and divide in half.
  5. On a floured surface, roll out dough and place on an oiled baking sheet. Stretch the dough towards the edges.
  6. Allow the dough to rise again for about 1/2 hour.
  7. Pre-heat oven to 400℉
  8. Lightly brush the dough with olive oil and season with salt and pepper.
  9. Bake until the dough is cooked through and golden brown on the bottom.

To Assemble the Flatbread

  1. Spread the warm pizza crust with the goat cheese mixture.
  2. Sprinkle with diced beets, sliced green onion and any herbs you desire.
  3. Season with salt and pepper.
  4. Slice and serve.

Clara Cannucciari’s Asparagus Sandwiches

Last year, I became fascinated with Clara Cannucciari (August 28, 1915-November 29, 2013) after reading Clara’s Kitchen, a book she co-authored about growing up during the Great Depression. The cover of her book states she is, “Everybody’s favorite YouTube Grandmother,” as she also hosted online cooking segments through age 96. 

She’s certainly mine, as none of my grandmothers ever appeared on YouTube, not even our incredible adopted Grandma Burrell. 

Clara describes growing up during a time when food was scarce and jobs, scarcer. She shares the recipes that sustained her family and the necessary adjustments they made to reduce food wastage and save money. Her recipes are simple. Some, remarkably so, yet I often found myself wondering, “Why didn’t I think of that?”

Her family was rarely able to afford meat and relied on sustainable and local food systems such as raising their own chickens for eggs, planting a vibrant garden, canning excess produce, and foraging for wild edibles.  For example, Clara describes how to prepare dandelion greens and burdock stalks, plants that are still available in our own backyards or parkways.

Did you know that you can place anything between two slices of bread and call it a sandwich? My significant other and I have eaten many recipes from Clara’s book, including many of these sandwiches. One evening, we made “Salad Sandwiches” from leftover rainbow chard quickly blanched in hot water, shocked in ice water, and sautéed with olive oil, garlic, lemon juice, salt and pepper. We also feasted on eggplant burgers, replacing ground beef with a fried slice of eggplant, plus the usual burger accoutrements. 

Our favorite of all was this asparagus sandwich and we’ve made it many times, since.

Asparagus Sandwich EditedClara’s Asparagus Sandwich

Ingredients:
1 bunch of asparagus, woody ends removed
Extra Virgin Olive Oil
Sea salt
Freshly cracked black pepper
Sliced bread
Butter
Grated Parmesan or Pecorino Romano
Lemon or lime wedges

Directions:

  1. Preheat the oven to 425℉.
  2. Wash the asparagus. Remove the woody ends (I like to snap off the ends).
  3. On a sheet pan, drizzle the asparagus with olive oil and season with salt and pepper. Arrange the stalks in a single layer and roast for a few minutes. Flip the asparagus, and roast for a few more minutes or until tender.
  4. Toast your slices of bread and butter them. Place the asparagus between the buttered bread, sprinkle with freshly grated cheese, and spritz with a squirt of lemon or lime.

Ex-boyfriend Quinoa: A Sweet & Salty Salad Recipe

Back when I was a new college grad before I met Jake, I lived in little apartments around the Uptown neighborhoods of Minneapolis. I didn’t have cable television and I didn’t have internet. I ran two and a half miles every day and biked to the Rainbow grocery store on Lake Street. These were the years that I read my favorite food blogs but was too afraid to write my own. I entertained myself by renting books and DVDs from the library and had wonderful friends just as I do now, though some are different.

I only drank alcohol when I found myself at happy hours and never desired coffee. In fact, I didn’t even own a coffee maker back then. I definitely can’t say the same to either of these things today. Leftovers used to last a lot longer and now I measure a meal’s success by the lack thereof.

This recipe was inspired by one particular online dating adventure during these years. This particular ex-boyfriend, who would probably consider himself a foodie, was proud of his signature dish that he prepared on multiple occasions. Actually, it was his only dish, but at least it was good.

Obviously I stole it and made it my own over the years. Now, I have a salad that I can eat for days. It’s a little bit salty, a little sweet. Try it and add your own twists.

Quinoa Salad With Bell Peppers, Currants & Feta

A Cook’s Notes: You can find quinoa in the bulk bin area of your grocery store. It’s much cheaper than purchasing it by the package. Plus, you can scoop out exactly what you want so it doesn’t go stale. Quinoa grains are coated in saponins, a naturally bitter coating that repels pests. Rinse it in a fine mesh strainer, unless you buy a package that says it’s pre-rinsed. 

The same applies to feta. Grocery stores sell packaged feta in their cheese sections, but some also sell less expensive blocks of feta in bulk, priced per pound. French sheep’s milk feta is my favorite. It’s silky and creamy and lacks the bracingly salty bite. I used to buy French sheep’s milk feta at Holy Land Deli in Minneapolis, MN. 


Ingredients:
Quinoa, about a cup (You can cheat and use that pre-cooked packet stuff)
Twice as much liquid (water or stock)
Salt (omit if you are using a salty stock)
Bell peppers, diced
Green onion, thinly sliced
Olive oil
Lemon juice or your favorite vinegar
Feta cheese, diced into small cubes.
Currants or craisins
Black pepper
A delicious thing to add: Cooked lentils

Instructions:

To cook the quinoa:

  1. Rinse quinoa in fine mesh strainer and shake off the excess water
  2. Place quinoa in saucepan and add twice as much liquid. Bring to a boil. Add a dash of salt (if using water or low-sodium stock), stir, and reduce heat to low.
  3. Cover and steam until the water is absorbed and the quinoa is tender.
  4. Spread the quinoa on a sheet pan or baking dish and cool in the freezer while you chop and dice the vegetables and cheese.
To prepare the rest of the salad:
  1. Add as much diced bell pepper to the quinoa as you’d like. I added about half a yellow and half a red bell pepper.
  2. Add green onion. I like a lot of onion flavor so I added several.
  3. Sprinkle in a good handful of currants for sweetness.
  4. Toss in diced feta, adding just enough to get a salty note in each bite.
  5. Toss the salad with fresh lemon juice or vinegar and a good drizzle of olive oil.
  6. Season with additional salt, pepper, vinegar and oil as needed.

Everything But the Kitchen Sink Beans & Rice: A Recipe

“What’s for dinner?” my husband asks every night.

It’s not that he is incapable of cooking dinner, it’s just that no one would probably want to eat it. What Jake does do well is order a might fine pizza and brew a strong pot of coffee. I can live with that.
For the past couple nights, my reply has been “beans and rice.” Jake wasn’t sure he liked beans and rice asked if we could order a pizza. On this evening, I put my foot down. We were going to eat rice and beans. 
Beans and rice is simple and it’s nutritious. It’s also inexpensive and they were already in my pantry. One of my weaknesses is not thinking ahead and planning weekly menus which makes it too easy to return to the grocery store and make impulse purchases. This was a good opportunity to play Chopped with the back of my own pantry. 
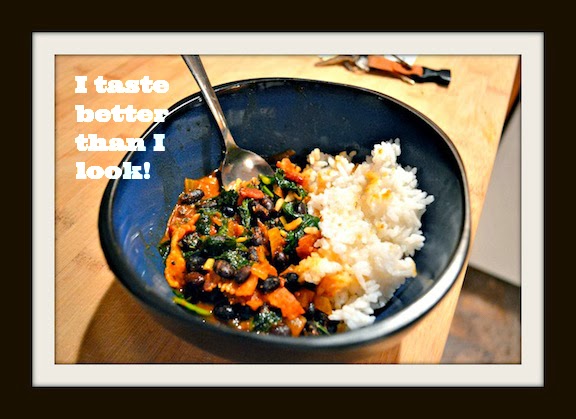
In this pot of beans, I added everything but the kitchen sink and, somehow, it all worked.

Everything but the Kitchen Sink Beans & Rice

A Cook’s Notes: I cook by the seat of my pants, so consider this recipe general guidelines. Incorporate any flavors you like and use whatever is already in your kitchen. 

I like blanching green such as kale, chard, and turnip greens because I think it improves their flavor and preserves their green color. However, this isn’t necessary. I don’t usually blanch collard greens and would throw fresh spinach directly into the pot since it wilts so quickly. 

I enjoyed this meal so much that I almost forgot to take a photo, remembering mid-bite.

Ingredients:
3-5 strips of bacon, cut into bite sized pieces
1 can of black beans, rinsed
1 bunch of turnip greens, blanched (could use kale, chard, collards, etc.)
1 small onion, diced
1 large clove of garlic, minced 
1/2 small can of tomato paste
2 tablespoons of hot madras curry powder 
1 teaspoon cayenne pepper (I like it hot)
Black pepper
1-2 glugs of whatever beer you are drinking (I used Grain Belt Premium)
1 cup + of stock 
Soy sauce, to taste
Drizzle of maple syrup or honey

Steamed rice

Instructions:
Render the bacon until it’s crispy. Scoop out the pieces out with a slotted spoon and drain on a paper towel. Save your bacon fat in the fridge to use later, leaving a little in the pan to cook the onions.

Saute the onions in the bacon fat until slightly browned. Add the garlic and saute briefly.

Add the curry powder, cayenne, salt and black pepper and saute until they smell fragrant.

Add the tomato paste and cook until it turns a rusty color.

De-glaze the pan with a splash of beer, scraping up the crusty residue on the bottom of the pan. Add the stock and stir.

Add the beans and greens. If the sauce is too thick, add more water, stock, or beer.

Season with soy sauce and a small drizzle of maple syrup for balance. Return the bacon to the pot.

Simmer so the flavors can meld and serve with steamed rice.

To blanch greens:
Heat a pot of water to boiling.

While you wait for the water to boil, wash the greens and remove the woody stems. You can save the stems for stock or chop them into tiny pieces and blanch them with the rest of the leaves. When the water boils, drop the greens in the water for a minute. 
Remove the greens place directly into a bowl of ice water until completely cooled. 
Remove the greens from the ice water, squeeze, and chop into bite-sized pieces. 
« Older posts Newer posts »

© 2024 Jeni Eats

Theme by Anders NorenUp ↑

Twitter
Visit Us
Follow Me
INSTAGRAM